Step 1. Entering Account Numbers
In order to properly export your daily or monthly general ledger for use in your accounting program, you first have to enter your account numbers in the system.
Log into the system, and then access the Setup menu. Select Store Settings tab, and then the Message tab in the lower part of the window.
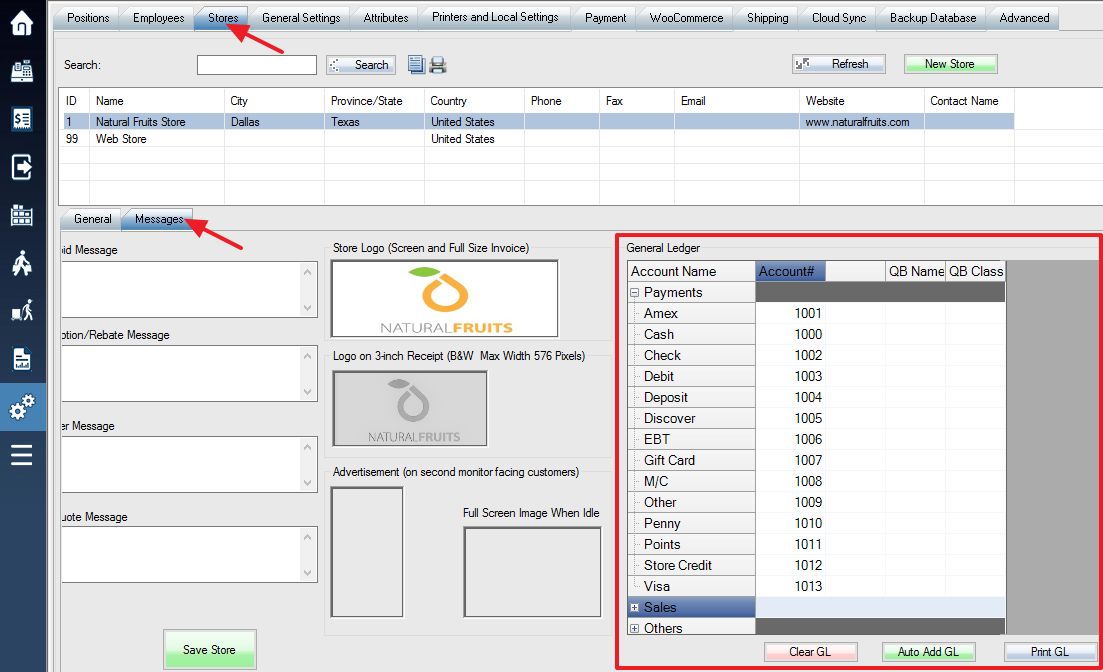
Under the Account Name field in the lower window, you will see a list of every account that your store currently uses. Simply fill in the first empty field (Account Number) with the corresponding listing from your chart of accounts.
(See: General Ledger Accounts for a detailed overview of each account type)
Some entries may have the same account number depending on your accounting setup. Make sure that every account that will be used is assigned a number, although unused accounts can be left blank (credit cards your store does not accept, for example).
Use the Save Store button to save your changes.
Step 2. Creating General Ledger Files
Your general ledger can be imported into QuickBooks on either a daily or a monthly basis. The daily GL files are created automatically every time the store’s day end is saved (see: Day End)
If you would rather create a monthly GL then while in the day end window, you will see a button at the bottom of the screen labeled “Create GL <month>” with the previous month listed. For example, if the current month is January, then the button will display as Create GL (Dec). Selecting this button will export a general ledger for the month listed.

The date in the screenshot is February 1, therefore the Create GL button will create a ledger for January. Please note that all day ends must have payment totals entered under the Payment Amount column for the file to be created properly.
You can also manually change the date of your day end screen in order to upload a general ledger from a previous month.

Step 3. Importing
In order to import the GL file into Quickbooks, open your company file. Then select the file menu at the top left of the menu bar. Use the drop down menus to select Utilities, followed by Import, and then IIF Files.

You will be prompted to select an IIF file. By default, WooPOS places its exported GL files into the GL_OUT folder inside your WooPOS data folder: C:\WooPOS\GL_OUT. The files end with .iif and are named according to the date they were created, either a specific day or an entire month, depending on how you prefer to import your information.
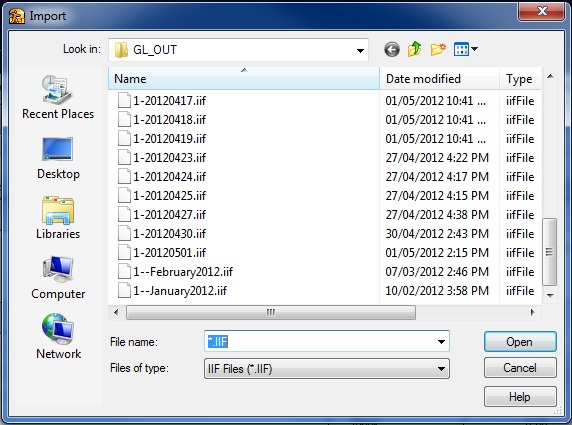
A list of GL entries ready for import. Daily GL files are named in YYYY/MM/DD format (for example 20120417.iif is the file for April 17, 2012), while monthly GL files are simply named with the month and year (such as February2012.iif). The 1- in front of the files signifies that these are the files for store number one.
NOTE: If you forget to populate an account you may get an error when attempting to import the file. You can open the Text (.txt) or Excel(.csv) format of the file produced to the date to review the results.