Forum Replies Created
-
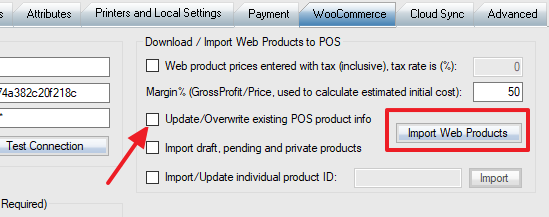
You can import products here:
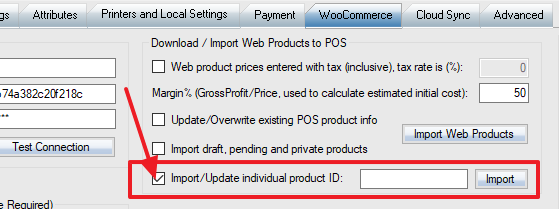
Or import individual product one by one:
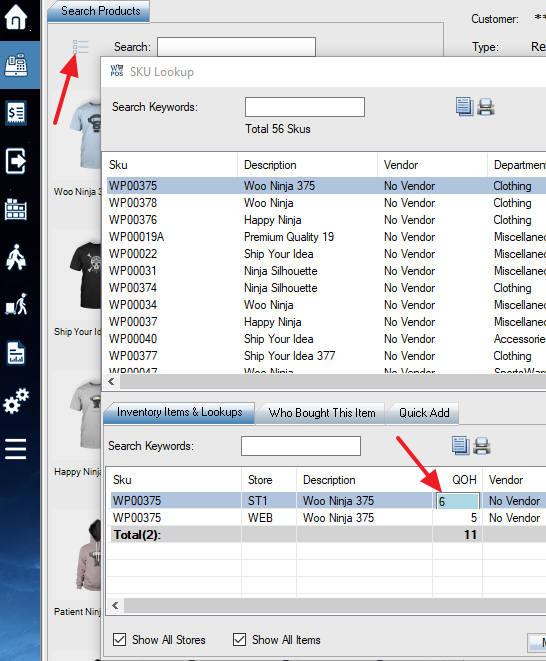
You should NOT change stock quantities in WooCommerce, as WooCommerce does not track qty changes history. The qty will not sync back to WooPOS. Please change in WooPOS, we have just added a quick change function here:
We don’t sell hardware. WooPOS works with most POS Peripherals hardware.
You can check price here:
http://www.posequipmentstore.com/categories/Barcode-Scanners/ (this is our partner in Canada)
https://www.aliexpress.com/wholesale?SearchText=barcode+scannerThis is because of you renamed “No Vendor” to “Central Pet Distribution”. Please get the upgrade, the default vendor should be “No Vendor” now. For existing products, please create an Excel file with Sku and Vendor, and import (with update) the file.
The default vendor is “No Vendor”. Do you want to change it to blank?
You need to close and re-open POS to refresh. Most people don’t add categories often. I have just added a manual “Reload Categories” button, so you can refresh without restarting POS. Please get the upgrade. The department name in WooPOS won’t be uploaded to WooCommerce. You have to create the categories in WooCommerce and select them in product editing screen either in WooPOS or in WooCommerce.
In POS screen, you can go “F3 Transactions” (not “Web Orders”), select the web order, then “Copy From Transaction”, and make changes.
Right. WooPOS coupons and points are separated from WooCommerce online coupons and points, cannot mix at this time.
You can still change order status to “Refunded” on the web. And select “Finalize/Invoice” (convert to invoice) in WooPOS web order screen, and then create an extra manual adjustment invoice in WooPOS.
The outstanding web order items stock is “on-hold” in WooPOS. If you invoiced out or canceled/refunded the order, it will not be “on-hold” anymore. The final QOH = Received(PO) – Sold(Invoiced) –
OnHold(Outstanding).Currently, WooPOS treats status “Refunded” as a full refund. If you do partial refund or exchange, please manually create a new invoice in WooPOS, this way the QOH will get updated.
Good question! What will order status be if you do a partial refund?
You can add a status “Exchanged” to Web. But it won’t do anything in WooPOS. If you change status to “Cancelled” or “Refunded”, the stock will be added back to QOH.
To do an exchange, you have to create a new invoice in WooPOS, sell original items with negative quantity (or use Return function), and sell new items with positive quantity. You can do the same thing on the web, or modify the order on the web, but all changes (except order status) will not be synchronized back to WooPOS.
You can set up how many points minimum to redeem, but we don’t have a function to limit maximum points to redeem. You can hit INSERT key in points field in the payment window to automatically calculate how many points are available to redeem. WooPOS has a function (switch 049) to convert points to Coupon once points reach minimum redeem points. It’s hard to do everything exactly same way, especially on WooCommerce because plugins are designed by different people in different ways.
We don’t have this feature at this moment. You have to manually convert them between WooCommerce and WooPOS now. We will address this issue in future.
Enable switch 100 in store settings. You can change the transaction date from F3 transaction listing screen. Just double-click the date. Administrator login is required.
You can log in up to two computers at the same time using the same user account. Our pricing model only counts user accounts, not computers. This is good for starting companies and seasonal businesses. You can also install on your laptops and home computers, without extra charges.