Forum Replies Created
-
You can just create an SKU called “miscellaneous” or “misc”, leave the description blank and price zero. When you sell the SKU, the system will ask description and price on the fly.
To create an SKU at POS front end when selling, type CREATESKU in the code box where you scan the barcode.
If you do special order or custom work, you can use SPECIALSKU
You can also create an SKU starting with the word AUTOSKU. When you complete the transaction, the system will automatically create a new SKU using AUTOSKU as a template. This is the same as SPECIALSKU, but it will not force you to complete the transaction as a special order.
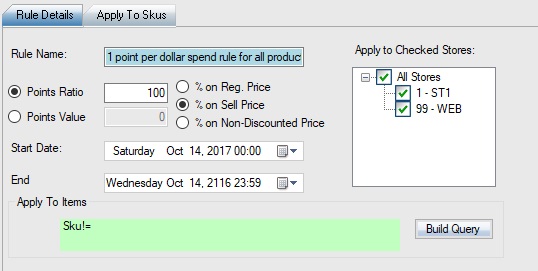
Here’re what you need:
100% means 1 point per dollar spent. Spend $100 to get 100 points.
Set the exchange rate to 0.05 means 100 points worth $5 when redeeming.
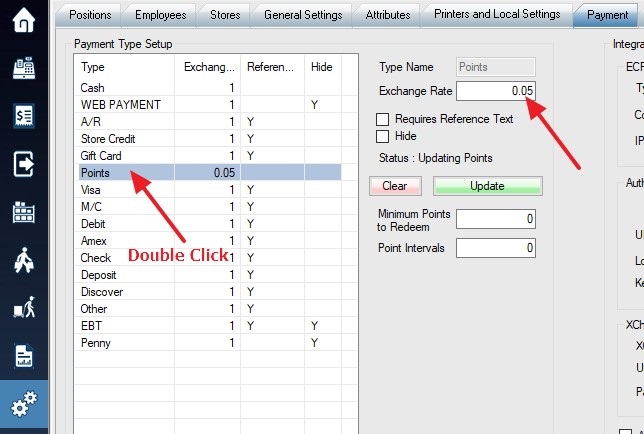
Alternatively, you can set 500% as the ratio and 0.01 as the exchange rate.
In payment windows, select the POINTS as payment type, hit the INSERT key, the system will automatically calculate how many points need to pay.
You can add one of the following lines to special database field of the barcode in the label designer. Please use Code39 or Code128, don’t use UPC or EAN.
TransactionNumber
convert(varchar,storeid)+'-'+convert(varchar,transactionnumber)
You can print barcode on the receipt by checking the checkbox “Print Bar Code on Receipt” in General Settings. When you use F3 Recall transaction, you can scan the barcode into transaction# box.
WooPOS always recalculates stock level on every new transaction (or order, count, adjustment) based on whole historical transactions. If any stock changes detected, WooPOS will push new stock quantities to WooCommerce. So if you apply the inventory count variance, the stock quantities will be automatically synchronized to WooCommerce.
When you do a return in WooCommerce or a plugin, the order status should be changed to return or canceled. WooPOS should detect the status changes, recalculate QOH and change stock quantities accordingly. Please give a try, let us know if any problems.
You can copy and paste this whole line into “DatabaseFieldSpecial” field in the label designer:
(case when phone1!='' then phone1 when phone2!='' then phone2 else cellphone end)
You can print label in customer section. Or in POS–>F3 Transactions–>More–>Print Custom Form. This label will be based on your transaction (customer and due date etc) or transaction items (product info and attributes). At end of the transaction, after payment window, re-print receipt area, there’s a “print custom form” button.
You have 2000 products and 7000 images. The system was trying to load all images. I have changed to load up to 500 images. You can type keywords to search the images. Please get the upgrade and try again.
The new category created in WooCommerce will automatically show up in WooPOS. The products with categories changes in WooPOS will be pushed to the web (WooCommerce) automatically. You don’t need to do anything.
You can create a consignment Sku:
You’ll need to create a new consignment Sku for a new customer, don’t re-use the Sku.The consignment report can be found in Reports–>Customers section.
Please get the upgrade to fix the negative amount problem you may have.
Please take a look at Reports -> Product -> Receiving History with the query “posted = true”.
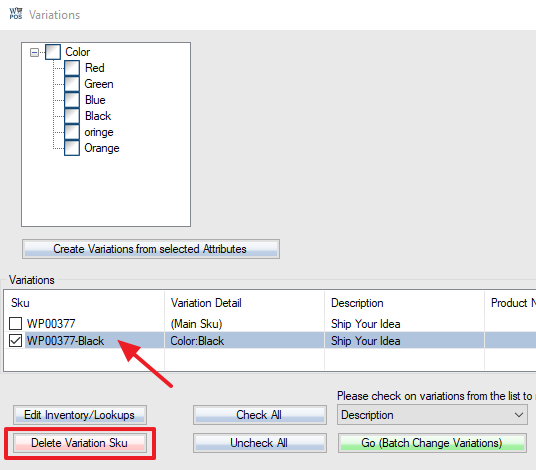
There are two ways to delete variation Skus.
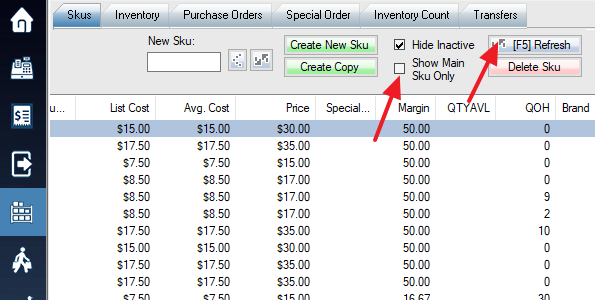
1. In Skus tab, Uncheck the “Show Main Sku Only” checkbox, and hit F5 or Refresh. Once the variation Sku shows up, just select the variation Sku and click “Delete Sku” button. After you deleted all variation Skus, you can delete the main Sku.
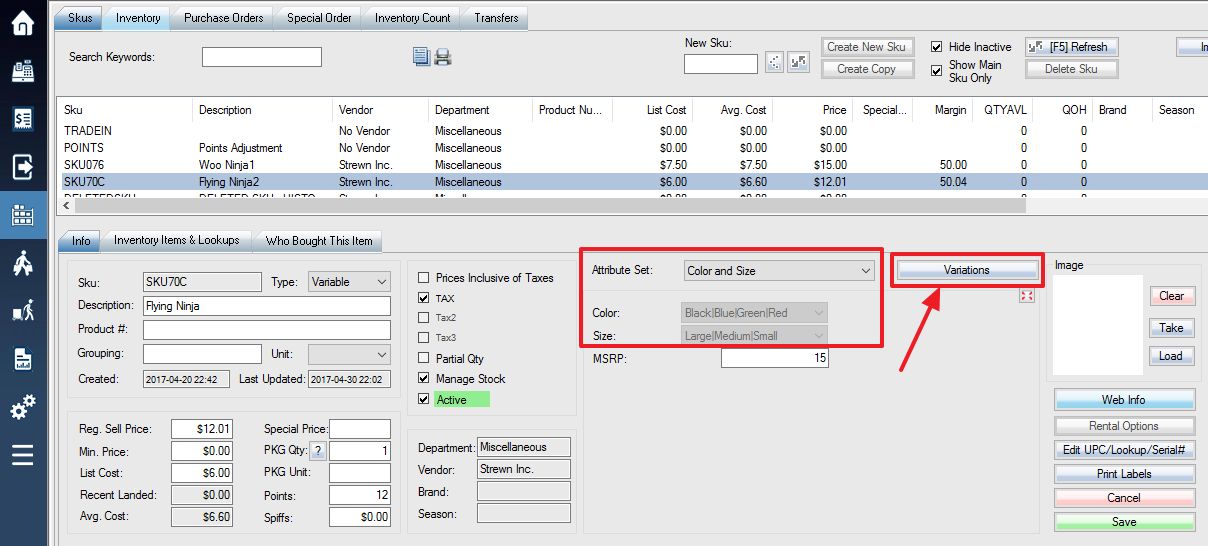
2. Click the “Variation” button in Skus Info tab, select the Sku to delete, click the “Delete Variation Sku” button.
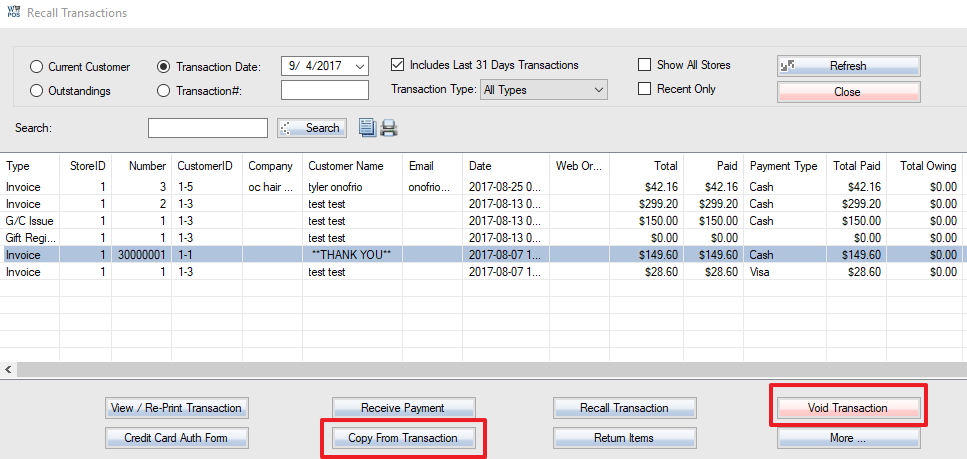
You can just void the transaction with the wrong customer. And make a copy of the transaction, and select the proper customer and finish the transaction.
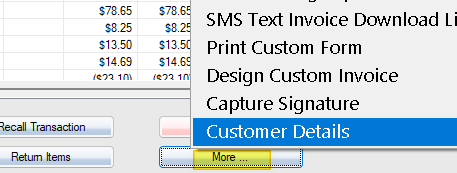
Or click the “More” button, select “Customer Details”. And select the customer you want to change to.
It’s recommended to backup your WordPress and WooCommerce website before enabling this option. But you don’t have to the backup. When you create a new product in WooPOS, you still need to go to “Web Info” and “Publish” the product. If you changed a web item information like price, description(title) in WooPOS, and you have the “Automatically upload online products when changes made in POS” option switched on, the item info will be uploaded to WooCommerce site automatically. Attributes will be uploaded, but departments won’t. For details, please check here:
